Step 01 - Select Correct IDE
First of all you need to select a correct and suitable IDE. Currently in the IT field most using Eclipse, IntellijIDEA and Netbeans for java development. For android development Eclipse and IntellijIDEA are the mostly using IDEs. These two IDEs has the biggest community so far. (if you interested in see the caparison of these amazing two IDEs, look my previous post.) For this tutorial I'm using Eclipse IDE which is most famous and free.
If you using eclipse download the custom setup eclipse IDE for android using below link.
http://developer.android.com/sdk/index.html
If you interested in intellijIDEA, use below link to download.
http://developer.android.com/sdk/installing/studio.html
Extract the downloaded file and run .exe file.
Step 02 - Open & Setup IDE
You will have something like below, if you using eclipse.
Select a workspace for save your projects and save metadata for eclipse.
Step 03 - Create New Android Application Project
Go to File->New->Other->
Now window will be open including all the type of projects available to create. Select Android->Android Application Project
Step 04 - Select Correct Project Settings
Then, You can enter your project name, Package name,.. etc as below. Be sure you package is unique for you, otherwise your package name could be the worst nightmare when you are planning to publish your application in Google play android market.
Next important point is selecting correct API level; 2.2(Froyo) is the most common android framework between the users. But if you are planning to create a application for higher API level, select appropriate one. Here I'm using 2.2 since it is the most common.
Note: above API level have more functions than the lover API levels. for more information visit this link.
when proceed to next page, Select the default settings as below
when proceed to next page, Select the default settings as below. You can change the launcher icon later.
Then select the blank activity.
give a name to your first activity.
All the drawable folder contain the images, layout folders contain the all the interfaces(layout xml files), menu folder contain the xml file for menu, values folder contains the styles, strings, .. etc.
When our project runs on different sizes of screens, our app should be responsive to every type of screen sizes, even landscape and portrait views. For that android has given many options, we can create our different type of files and images in a correct folder; android make sure runs them on each type of devices.
Lets understand the folder types of android, Please refer below table,
In our created project, we have some folders like drawable-hdpi, drawable-ldpi,...etc. The description about hdpi, ldpi.. are mentioned above table.
if we rename our layout folder like
* layout-land-large ==> if app is running on landscape mode in a larger device like 7 inch tab, layouts in this folder will be executed.
* layout-port-small ==>if app is running on portraite mode in a smaller device like 3.5 inch phone, layouts in this folder will be executed
This concepts applied to all other folders as well (drawable, value, layout,...etc)
Step 06 - Edit Layout
Double click on the layout.xml in the layout folder. Now you can see there is a text field on the interface. Lets edit the text field text.
Go to values folder and open the strings.xml file double clicking it. Change the text under 'hello world' string tag like below.
<string name="hello_world">This is my first android applicaiton...!!!</string>
Now we are ready to run our project. For that we need a virtual device.
Step 07 - Create & Use Virtual Device
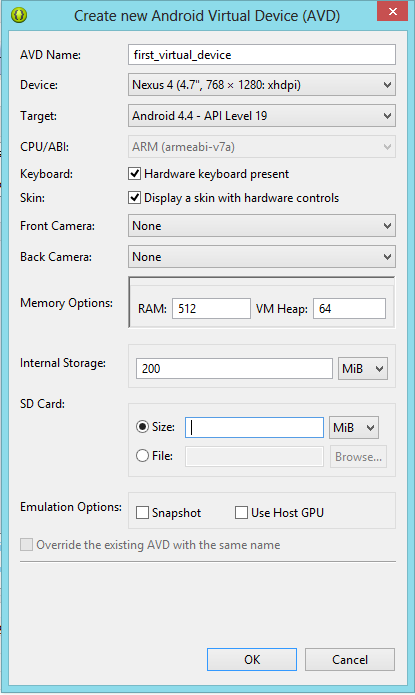
To create a virtual device go to Window menu->Android Virtual Device Manager. When you click on it below window will open.
Click on New button and select the options as below,
In here we are using Nexus type of virtual machine.
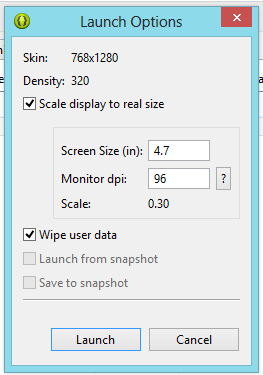
Then Press OK, below window will open up.
Select the two check boxes and click Lauch.
Virtual device will be loaded like this,
Step 08 - Run Your Project
First you need to clean and build the project. For that go to Project=>select auto build and again click clean.
Then right click the project Run as=>Android application, eclipse automatically select our created virtual device and runs on it.
Note : if we have more than one virtual device or externally connected device, eclipse virtual device manager will ask us to select the device to run. Then we should select the appropriate virtual device and select run.
if eclipse ask something like this when you run the project, select yes and select error from drop down and click OK. This will allow to record logs on errors in our application.
When you successfully run the project,
Note : run time exceptions and android related errors and warnings logs are in logcat console.
If you need to download the sample project.
Comment below if you have any questions or any idea, If you enjoy this Please leave a comment...
Cheers !!!


No comments:
Post a Comment