Tuesday, February 11, 2014

8 Steps Of First Android Project Setup

People are very much interested to learn and experience the Android development. Every developer should know how to setup an android project in a correct way. Most of the beginners and mid range android developers stuck in their projects in the middle, because of their incorrect project initiation process. It's not hard, it's just right key to right key hole.

Step 01 - Select Correct IDE

First of all you need to select a correct and suitable IDE. Currently in the IT field most using Eclipse, IntellijIDEA and Netbeans for java development. For android development Eclipse and IntellijIDEA are the mostly using IDEs. These two IDEs has the biggest community so far. (if you interested in see the caparison of these amazing two IDEs, look my previous post.)  For this tutorial I'm using Eclipse IDE which is most famous and free.

If you using eclipse download the custom setup eclipse IDE for android using below link.
http://developer.android.com/sdk/index.html

If you interested in intellijIDEA, use below link to download.
http://developer.android.com/sdk/installing/studio.html

Extract the downloaded file and run .exe file.

Step 02 - Open & Setup IDE

You will have something like below, if you using eclipse.


Select a workspace for save your projects and save metadata for eclipse.


That's all, Now you are ready to create your first android application.

Step 03 - Create New Android Application Project

Go to File->New->Other->


Now window will be open including all the type of projects available to create. Select Android->Android Application Project


Step 04 - Select Correct Project Settings

Then, You can enter your project name, Package name,.. etc as below. Be sure you package is unique for you, otherwise your package name could be the worst nightmare when you are planning to publish your application in Google play android market.

Next important point is selecting correct API level; 2.2(Froyo) is the most common android framework between the users. But if you are planning to create a application for higher API level, select appropriate one. Here I'm using 2.2 since it is the most common.

Note: above API level have more functions than the lover API levels. for more information visit this link.


when proceed to next page, Select the default settings as below


when proceed to next page, Select the default settings as below. You can change the launcher icon later.


Then select the blank activity.


give a name to your first activity.


That's all, Now our project creation is completed. Let's see the project structure.


All the drawable folder contain the images, layout folders contain the all the interfaces(layout xml files), menu folder contain the xml file for menu, values folder contains the styles, strings, .. etc.


Step 05 - Create Correct Folder Hierarchy

When our project runs on different sizes of screens, our app should be responsive to every type of screen sizes, even landscape and portrait views. For that android has given many options, we can create our different type of files and images in a correct folder; android make sure runs them on each type of devices.

Lets understand the folder types of android, Please refer below table,


In our created project, we have some folders like drawable-hdpi, drawable-ldpi,...etc. The description about hdpi, ldpi.. are mentioned above table.

if we rename our layout folder like
* layout-land-large ==> if app is running on landscape mode in a larger device like 7 inch tab, layouts in this folder will be executed.
* layout-port-small ==>if app is running on portraite mode in a smaller device like 3.5 inch phone, layouts in this folder will be executed

This concepts applied to all other folders as well (drawable, value, layout,...etc)


Step 06 - Edit Layout

Double click on the layout.xml in the layout folder. Now you can see there is a text field on the interface. Lets edit the text field text.


Go to values folder and open the strings.xml file double clicking it. Change the text under 'hello world' string tag like below.

<string name="hello_world">This is my first android applicaiton...!!!</string>

Now we are ready to run our project. For that we need a virtual device.

Step 07 - Create & Use Virtual Device

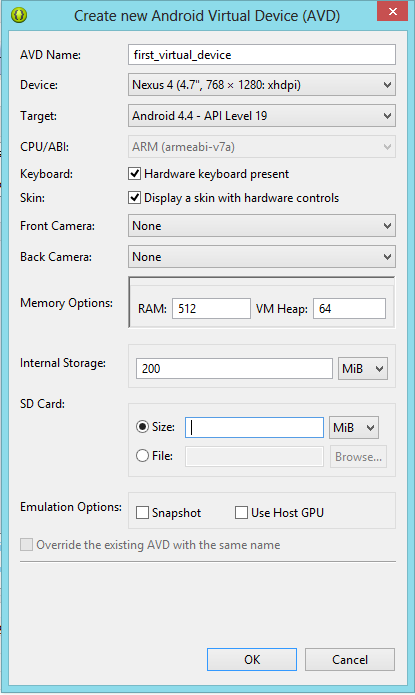
To create a virtual device go to Window menu->Android Virtual Device Manager. When you click on it below window will open.


Click on New button and select the options as below,


In here we are using Nexus type of virtual machine.

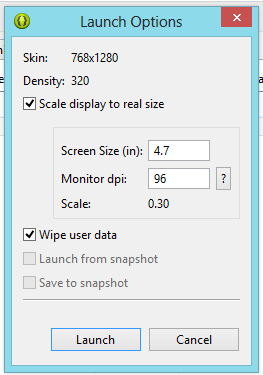
Then Press OK, below window will open up.


Select the two check boxes and click Lauch.

That's all for Virtual device creation, Give some time to load the virtual device.
Virtual device will be loaded like this,


Step 08 - Run Your Project

First you need to clean and build the project. For that go to Project=>select auto build and again click clean.

Then right click the project Run as=>Android application, eclipse automatically select our created virtual device and runs on it.

Note : if we have more than one virtual device or externally connected device, eclipse virtual device manager will ask us to select the device to run. Then we should select the appropriate virtual device and select run.

if eclipse ask something like this when you run the project, select yes and select error from drop down and click OK. This will allow to record logs on errors in our application.


When you successfully run the project,


Note : Normal project like build errors, file errors, .. etc will log on normal eclipse console (if you can't see your console go to window menu=>show view=>console).


Note : run time exceptions and android related errors and warnings logs are in logcat console.


If you need to download the sample project.


Comment below if you have any questions or any idea, If you enjoy this Please leave a comment...

Cheers !!!


Monday, February 10, 2014

Include Custom Library Into Maven Local Repository

Most java developers familiar with Maven which is innovative software project management tool. Simply this maven tool capable of manage your java project jar file dependencies using a global jar repository. We only need to maintain a pom file which includes all the need jar file dependencies.

Most of the people know what mention above, but very few people know how to add a custom jar file to the maven repository. It's easy as cake.

Please follow below easy steps,

(1) Download or create your own jar file and save it in your pc.

(2) Use below command in the command line, make sure your mvn classpath configuration completes before this step.

mvn install:install-file -Dfile=c:\{your jar file name}-{version}.jar -DgroupId={package name} -DartifactId={name} -Dversion={version} -Dpackaging=jar

find below example,
Let's say we have a jar file called pdf_writer.jar

mvn install:install-file -Dfile=c:\{your jar file name}>-{version}.jar -DgroupId={package name} -DartifactId={name} -Dversion={version} -Dpackaging=jar

if you execute this command successfully, maven gives you a successful message on the console.

(3) Now last step, Update the pom xml file.

<dependency>
      <groupId>com.starfish.pdf</groupId>
      <artifactId>pdf_writer</artifactId>
      <version>1.2</version>
</dependency>

That's all we have to do, Now we can retrieve the jar dependency for our pdf writer from our maven repository.

If you interested visit Apache maven documentation for more details.

Comment below if you have any questions or any idea, If you enjoy this Please leave a comment...

Cheers !!!


Sunday, February 9, 2014

IntelliJ IDEA VS Eclipse

There are lot of IDEs available for java web or mobile development. Most famous ones are Eclipse, Netbeans and IntellijIDEA. No point of review each of advance software pieces each other, each developer should understand the type of flow which they need on their day to day development tasks.


Eclipse latest version is kepler. Even though we doesn't noticed much updates on previous juno version of eclipse, you might have experienced kepler is more stable than ever. They have been upgraded lot of their back end services but not interfaces.
With latest version of Intellij IDEA has done a massive upgrade to the existing IDE back end and front end. When I'm writing this blog Intellij IDEA 13 is the latest version from jetbrains. Even though this is not a complete free software as eclipse, but free edition of IntellijIDEA have ability to do a pretty decent job for the developers.

IntellijIDEA is pretty famous between Android developers because Android developer website officially launched a android studio tool developed on IntellijIDEA. Also new look and feel of the IDE attracts many developers from Eclipse. If you really interested in new interface of IntellijIDEA you can refer my previous post on changing interface on Eclipse IDE to change your existing Eclipse IDE bit more attractive like IntellijIDEA.

If we compare the usability and functionality wise there are no big difference between eclipse and IntellijIDEA. Both IDE can do a amazing job. Both are pretty stable and has high usability standards, Both needs same system requirements. Both can be run on many os platforms like windows or linux.
But Eclipse has the biggest community ever when we compare with the other existing IDEs in the field.


VS


My personal opinion is, if you are comfortable with Eclipse no point of moving to IntellijIDEA, because it's same all the time. It's not worth to pass through a learning cycle for IntellijIDEA.

Please refer below links for more details on above.

(1) New features/Updates on IntellijIDEA 13
(2) New features/Updates on Eclipse kepler

(3) Getting started on IntellijIDEA


(4) Getting started on Eclipse kepler


Comment below if you have any questions or any idea, If you enjoy this Please leave a comment...

Cheers !!!


Saturday, February 8, 2014

Monitor JVM in Eclipse IDE

If you have ever faced memory issues on your application. Is your application fails on load testing. As an example when your code is creating many no of objects, did you ever realized how JVM handle this.

Specially on web application development on some point you'll need to tuned up your web server (tomcat, jboss, glassfish,..etc) to maximum performance. For that you'll need to monitor the JVM memory utilization and other related information.


You can use JVM Monitor eclipse plugin and monitor jvm pretty easily. Please find below easy steps to install this plugin to your eclipse IDE.

Option 01

If you are installing this plugin via eclipse market, go to eclipse market under help menu and type 'JVM Monitor'' and click install.

Option 02

If you want to install this plugin manually, download the latest zip file and extract it in the dropins folder in your eclipse extraction root.


Note:
This plugin implemented using pure java. If you interested in learning more on this, please refer the documentation on this link.


Comment below if you have any questions or any idea, If you enjoy this Please leave a comment...

Cheers !!!

Thursday, February 6, 2014

Apply New Dark Theme To Eclipse IDE

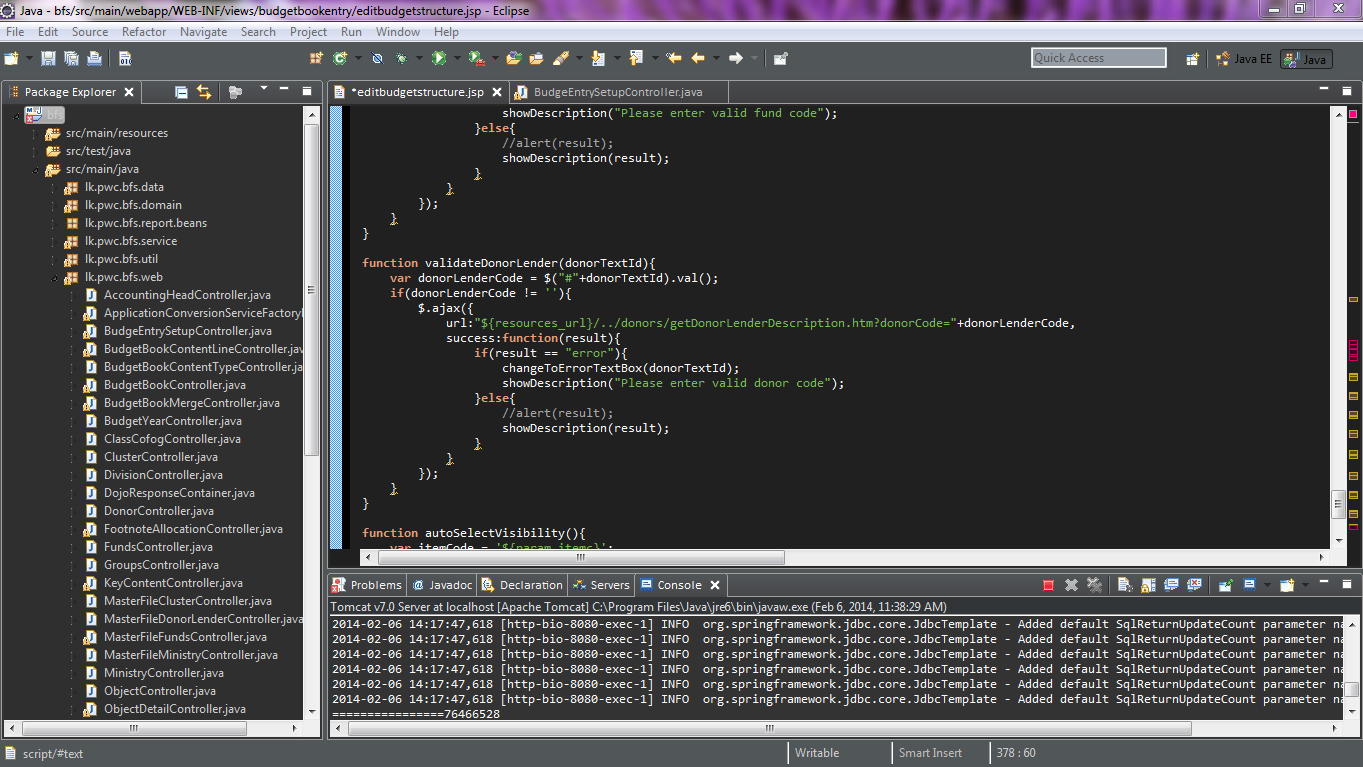
If you feel, you stuck to white background black fonts for a long time, I guess it's time to have a bit change on you eclipse IDE.

like below,


Today I will show you a easy way to change your default Eclipse IDE to Dark attractive one. Please follow easy steps as below.

Before we following the steps, I divide this to two main sections.
First one is change eclipse IDE (eg: menu, background, file explorer,... etc)
Second one is change the editor panel of IDE.

So Let's begin,

Changing Eclipse IDE
1. First download this com.github.eclipseuitheme.moonrise_0.8.6.jar file
2. Save it in dropins/plugins/ folder path in your eclipse extraction (find the dropins folder in your eclipse root folder, create another foder named plugins inside the dropins folder and save the downloaded jar file).
3. restart the IDE.
4. go to preference under help menu.
5. type Appearance and select Moon Rice from theme drop down menu.


Changing the editor
1. go to stall new software under help menu
2. paset the "http://eclipse-color-theme.github.com/update/" on work with text box and press add
3. Eclipse Color Them text will be appear in below box, checked it and press next.
4. accept the license agreement on next page and give some time to install it
5. if it give a warning like unsigned content, press ok. This is not virus or malware :)
6. after installed it successfully, go to preference under help menu.
7.  type Appearance and select color them item under Appearance.
8. select the most suitable one for your eye.


Comment below if you have any questions or any idea, If you enjoy this Please leave a comment...

Cheers !!!